Welcome to my site. Please sign in my guestbook and leave a comment whilst you are here.

Thursday 5 July 2007

Finished Portrait ( Ari )


The completed picture of our dog, Ari. I'm pleased with this portrait, all it needs now is a mount and frame to set it off , then it's taking pride of place on our livingroom wall .
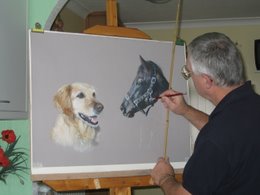
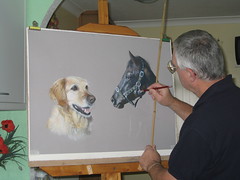
My Portrait Process

I have read many books and magazines describing the process used to achieve a great painting, but at the end of the day it's what works for you.....
So what does work for me?
Above is a pastel portrait that I started a couple of days ago. First in the process was to transfer the picture onto my computer, I cropped, lightened & increased the contrast, then printed the image the size I wanted, sometimes this could mean splitting the image over two or three pages. When I'm happy with the results I use tracing paper to trace a basic outline of the image using a B grade graphite pencil. Then on the reverse side using either a white or brown pastel pencil I draw the image again following carefully the lines on the other side, the tracing is then taped onto the surface chosen for the finnished portrait, pastel side down, I carefully draw the image again this time using a harder graphite pencil H or H2 this will leave a light copy on the chosen surface. ( I find this method allows me to move the image around my paper trying different compositions. )
Is this cheating?....Not at all, even the great masters had their own ways of acheiving great paintings.
Jan Vermeer 1632 - 1675 who painted some lovely portraits including Girl with the Pearl Earing is reputed to have used a Camera Obscura to help in the process.

Where I work

This is where I try and create my pictures, light, airy and warm when the sun is out

Monday 2 July 2007

Girl in a Hat (demo)

I was asked by a friend, the other day, if I could tell him where he could purchase a projector specifically for enlarging pictures onto canvas / paper or what ever medium for painting. This is what prompted me to start writing about my own methods, also being prompted by my son (see One Man's Travel Blog). Well I have tried one of these projectors. But found that either the method used to create Ari, or the grid method above Girl in a Hat, work just as well. Try not to get bogged down with detail, it gets confusing, keep it simple at this stage, adding the detail if you want as you progress through the painting. The grid above is 7"x7" this could be 3"x3" or 20"x20" you chose, just keep the proportions the same.
You could, of course, transfer the picture as a rough sketch first using the grid method refine the lines, also if you’re not sure about the composition or the picture, check it in a mirror this works for me. Then transfer the refined sketch onto you chosen medium.
Don’t forget these lines are only a skeleton to build upon NOT the finished piece.

Thursday 21 June 2007

Horse & Hound


Pastel Portrait
commission
What inspired me to create this portrait?
I was asked to commission a portrait painting of a dog and horse by a friend of my son. I was emailed a number of photographs that were taken the previous weekend. I felt that this would be a good opportunity to further practise hair and fur textures. Initially, the portrait was going to be small. However, after doing some primary sketches I realised that to get the appropriate proportions and to produce the required texture detail the canvas had to be of a reasonable size – I first established the size for the dog. This then dictated the size of the horse and subsequently the size of the canvas.

Why did I choose Pastel Pencils to produce this piece?
My first attempt at this piece, I tried Artist’s Colour Pencils – but wasn’t comfortable with hair textures and colour blending. As an example, I was unable to blend the colours of the dog’s hair. I had worked with Pastel Pencils once before on a smaller project and found that they provided a much better depth of colour for my style mainly due to the chalkiness of the pastel material. I find that when I apply pastel to paper, it comes alive.

How long did this piece take me?
Because of the intensity of the detail, I find that I can only spend around 2 hours at a time working on a piece. Any longer than this and I lose focus and it would lack the require quality of detail (even a short break doing the housework and restarting is enough to give me a break – much to my wife’s delight!!!). With this in mind, the overall piece took about 7 days with approximately 6 hours per day.

How did I feel about the end result and looking back, would I have done anything different?
I was overjoyed with the end result. When I reflect on it now, it is hard to comprehend how much I have progressed in comparison to previous commissions. I would not have done anything different with this piece, however next time I would do it with more confidence.

Wednesday 20 June 2007

Polar bears


Water colour
( for a Christmas card )
What inspired me to create this scene?
I thought it would be nice to paint a Christmas card to give for my wife, as this would be more personal than buying one from a shop. As my wife has a passion for Polar Bears – I thought this would be the idea subject.

Why did I choose Water Colour Paint to produce this piece?
I wanted this picture to be loose. I like the translucent quality of water colour and though this would be ideal to reproduce the snow and ice effect.

How long did this piece take me?
As my wife prefers water colour paintings to have minimal detail, so I kept it simple. Subsequently it only took about 2 hours over a cup of tea.

How did I feel about the end result and looking back, would I have done anything different?
I was happy with the overall picture and how I had managed to achieve the fur on the bears and the northern lights in the sky. To this end, I wouldn’t have changed the way in which I produced the piece. I am also relieved to say that my wife was very happy when she opened the envelope.

Japanese painting


Water colour
Commision
What inspired me to create this scene?
This commission was requested by a friend in exchange for one of his hand made clay statuettes. He asked if I could produce a piece in the style of Japanese art. This was going to be an experiment for me as I had not tried this style before. I very much enjoy the Japanese interpretation of nature, especially the work of Hokusai Katsushika

Why did I choose Water Colour Paint to produce this piece?
Most of the great Japanese pieces are ink/water colour. This would further develop my skills in water colour painting. To produce this piece, I have used my painting methods and tried to emulate the Japanese style .

How long did this piece take me?
This piece took me one afternoon – this included practice pieces.

How did I feel about the end result and looking back, would I have done anything different?
I was pleased with the end result as I had gained some confidence using the ‘wet on wet’ method of painting.

Poppies


Water colour
What inspired me to create this piece?
Paintings with splashes of vibrant colours have always appealed to me. My wife and I were looking for a picture to hang in our hallway on the wall opposite the front door. We wanted a warm picture that would fill a large empty space.

Why did I choose Water Colour Paint to produce this piece?
My wife likes very minimalist styled paintings with lots of empty paper and splashes of colour. To produce the poppy petals, I wanted to bleed the colour into the paper – water colour paints allow you to do this. Applying clean water to the paper first, then dropping colour into it.

How long did this piece take me?
After a few trial pieces, the whole picture took 30 minutes. It is important when doing a picture of this style, not to get carried away with over working the detail.

How did I feel about the end result and looking back, would I have done anything different?
This piece showed me that I can produce paintings of this style and have an ability to restrain my need for detail. I wouldn’t do anything different only practice more pictures of this style . Since hanging this piece I have had several commissions to produce similar.

Red Rose


Coloured pencils
What inspired me to create this piece?
I wanted a picture of a single red rose for a memorial card but couldn’t find one of the right shape and design.

Why did I choose colour pencils to produce this piece?
For this card I wanted a softer looking rose with delicate blending

How long did this piece take me?
For me this is a relaxing half hour of doodling.

How did I feel about the end result and looking back, would I have done anything different?
I achieved what I wanted – a soft delicate memorial rose

Nan (100th Birthday )


Pastel pencils
What inspired me to create this piece?
This picture was taken on nans 100th birthday. Her face, so full of character, inspired me to take up the challenge of putting pastel to paper for the first time

Why did I choose pastel pencils to produce this piece?
Some years previously I had seen a street artist using pastel for portraits and loved the skin texture achieved with this medium

How long did this piece take me?
For me this was a couple of days full of learning

How did I feel about the end result and looking back, would I have done anything different?
This picture proved the use of pastel in portraits for me. After the picture was finished I used a spray sealer , this dulled the picture, I have since spoken to different artists and some say they never use sealers, others use the sealer during the process but not at the end.

Diana Washington


Pastel pencils

Eric Dolphy


Pastel pencils

Annie & Max


Graphite pencils

Jenny

Graphite pencils

Scruffy Jack

Pastel pencils

Sunday 10 June 2007